We spent the afternoon today at the Japanese festival, or matsuri, in Trafalgar Square.

Japan Matsuri Festival Trafalgar Square 2014

The London Japan Matsuri is an annual event, celebrating aspects of Japanese culture – food, music, crafts, martial arts and, of course, calisthenics! It was a really fun and lively way of sharing and opening people up to new experiences.

Water balloons, Japan Matsuri Festival 2014 Trafalgar Square

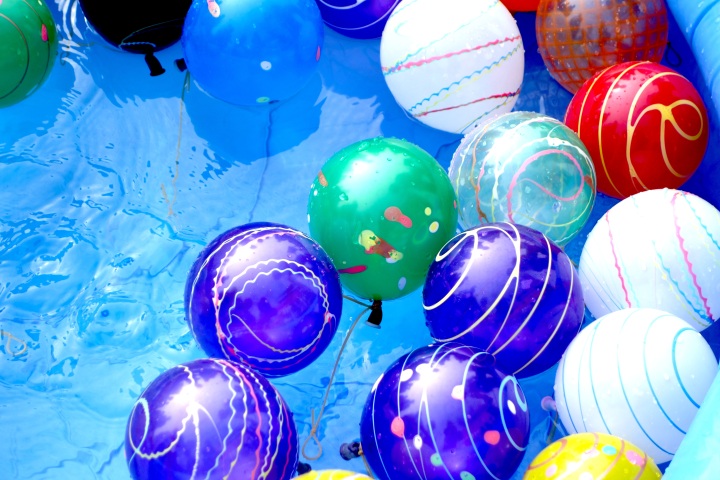
There were so many things to do – from more traditional events, like the ‘tsuri’ (fishing out water balloons with a hook – a childhood favourite), to karate demonstrations, to getting to pet some adorable dogs (which I unfortunately missed).

Kimonos, Japan Matsuri Festival Trafalgar Square 2014Graffiti wall totoro japan matsuri festival tralfalgar square 2014

There was a graffiti wall, where everyone made their mark (mostly manga/anime characters I’m clearly too out of it to know about!)

Japan matsuri festival trafalgar square 2014

As usual, Mr. A and I made a beeline for the food. All my favourite London-based Japanese restaurants had stalls there: Shoryu, Matsuri St. James’s and Atari-ya were all represented.

japan matsuri festival trafalgar square 2014

Most of the food stalls had ridiculous queues by the time Mr. A got there (just after midday), so we settled for the slightly pricier option of the Wagyu, or Japanese beef bowl. It was delicious – the meat was really succulent, and delicately seasoned with mirin. Definitely a recipe I will be recreating myself very soon!

wagyu beef bowl, japan matsuri festival 2014

I fell in love with some beautiful ceramic bowls – I’m a massive fan of white and blue china.

blue bowl japan matsuri festival 2014japanese accessories japan matsuri festival 2014

We caught some of the main stage activity, which included a Japanese cover of ‘Let It Go’ (Frozen is wildly popular in Japan), as well as demonstration of some daily calisthenic exercises. Almost everyone in Japan is brought up on these exercises, which they often do at work, or before school. Despite not having been in a Japanese classroom for 18 years, after hearing the music my body was going into autopilot – and I am shockingly bad at remembering any dance routines, ever.

japan matsuri festival 2014

There were fashion shows, music acts, all sorts of different activities. It was a really nice way to share some of my culture, and it was so great to see such a massive turn out. There were also several Fukushima stalls, raising awareness about the disaster.

japan matsuri festival

The festival organisers were really lucky with the weather – it was such a gorgeous day. It was a really nice way of sharing some of the great aspects of Japan, while the chaos and frenzy was London all over. And of course, despite being a festival in central London full of thousands of people, you run into people you know! It was a lovely afternoon – and I’m already looking forward to next year.

I love fried chicken, especially when it’s done right. My favourite is the Japanese twist on the dish, known as karaage. I’ve wanted to do this recipe on the blog for a while: the soy sauce marinade gives it a wonderful flavour, and it goes perfectly with a nice cold beer.

Gluten free karaage japanese fried chicken

Unfortunately, his version contains soy sauce, wheat flour and shaoxing wine, all containing gluten. I’ve adapted my recipe to be gluten free, and honestly? Not that much difference flavour. If anything, it tastes better. Being gluten free means you have to be creative with your ingredients, and it’s been fun discovering what works and what doesn’t. In this case, I substituted the flour for potato starch. Potato starch, known as katakuriko in Japanese, is what is usually used to coat karaage in Japan: just not in my family – until now! And once again, I can sing along to this classic by Ms. Peachez:

For a piece of my fingerlickin’ Japanese fried chicken, you’ll need:

500g chicken thighs

3 tsp tamari (gluten free) soy sauce

2 tsp sherry

1tsp mirin (Japanese cooking wine, available at most supermarkets)

2 cloves of garlic

vegetable oil

3 tbsp potato starch (I used Encona)

Encona potato stach gluten free
kitchen roll

lemon to serve

First, trim the thighs and discard any skin and excess fat, and cut into cubes. I would really recommend using chicken thighs for this recipe: I think thigh meat is seriously under-appreciated. It’s cheaper than breast meat, and almost always more moist and flavourful: the desired result for fried chicken! Put the thighs in the bowl, and add the tamari, mirin and crushed garlic.

Let it marinate in the fridge for at least an hour – for extra flavour, leave it overnight.

After the hour, remove the chicken from the fridge and set to one side so it reaches room temperature. Heat up enough oil in the pan on a high temperature so the cubes will be at least half submerged in oil.

While the oil is heating, wipe off each piece of chicken lightly with some kitchen roll and dab dry. This ensures that the marinade doesn’t drip, and removes the crushed garlic.

Potato starch japanese fried chicken karaage blue platepotato starch japanese fried chicken karaage recipe

Pour the potato starch on the plate, and lightly roll each chicken piece until coated.

gluten free japanese fried chicken karaage recipe

Try putting a wooden spoon or chopsticks in the pan of oil: if it bubbles around the implement, it’s ready. Start frying the chicken until brown and crispy.

Once the chicken has fried, pop the pieces on a plate covered in kitchen roll to catch the oil.

japanese fried chicken karaage gluten free recipe

Serve with a squeeze of lemon. Mr. A and I had it ours with some miso soup and rice, but they work perfectly as an appetizer too!

gluten free japanese fried chicken recipeestrella damm daura gluten free beer

And as for the cold beer? I’ve discovered Estrella Damm Daura gluten free beer – was expecting the worst, and was so very pleasantly surprised. No difference in taste, which makes it the perfect accompaniment to my version of Uncle Katsuyuki’s famous dish!

I’ve begun to experiment more with gluten-free baking, and with Japanese ingredients in particular, which I’ve found are usually low in gluten anyway. Kinako is a Japanese roasted soybean flour, frequently used in Japanese confectionery. I’d never used it for baking before, but as it’s gluten free I thought I’d have a go at a cookie recipe. kinako flour (gluten-free)

Kinako has a nutty flavour, with the texture of icing sugar or flour. The taste is subtle, and reminiscent of maple syrup or peanut butter. Kinako, which means ‘yellow flour’ in Japanese can be made fairly easily: if you are lucky enough to have a thermomix, you simply blend roasted soybeans into a light powder. For those of us who don’t, you can get your hands on it here in the UK, and on Amazon in the US (here).

One of my favourite ways of eating kinako is ohagi, which is a Japanese dessert. I’m also a massive fan of mixing kinako with vanilla ice cream. For breakfast, my grandmother occasionally eats plain yogurt topped with kinako powder, dried blueberries and a brown sugar syrup. This was my inspiration for these cookies, and I think they turned out really well!

They have a soft, crumbly texture, similar to Russian teacakes. This recipe makes 12 cookies.

Kinako, blueberry and sesame cookies (gluten-free)

For the kinako cookies, you’ll need:

100g salted butter

50g muscovado sugar

5g sesame seeds

25g dried blueberries

130g kinako (roasted soybean) flour

2tsp gluten-free baking powder

1 egg

25g icing sugar

Pre-heat the oven to 170 degrees (celsius). Whip the butter and sugar until creamy, then fold the egg in gently.

Kinako, blueberry and sesame cookies (gluten-free) Kinako, blueberry and sesame cookies (gluten-free)

Add the remaining ingredients: the kinako flour, the baking powder, blueberries and sesame seeds (saving some of the seeds for later).

On a lined baking tray, separate the batter into balls, and top with some of the remaining sesame seeds.

Kinako cookies topped with sesame seeds (gluten-free) Kinako cookies (gluten-free)

Pop the cookies into the oven for 15 minutes, until the sesame seeds have toasted. Place on a baking tray to cool, but be careful as they are very crumbly!

Kinako, blueberry and sesame cookies (gluten-free)

Once the cookies have slightly cooled, top with icing sugar.

Kinako, blueberry and sesame cookies (gluten-free) Kinako, blueberry and sesame cookies (gluten-free) Kinako, blueberry and sesame cookies (gluten-free)

Serve with a cup of hojicha (roasted green tea), or a pot of English Breakfast!

Kinako, blueberry and sesame cookies (gluten-free)

Matsuri St. James has some of the best Japanese food in London.  It’s a stones throw from the Ritz, and in my experience is one of the most authentic Japanese places to dine in the UK.

Matsuri St JamesMatsuri St James Matsuri St James

The dining area is situated in the basement, and is full of hibachi (grill) tables. I opted for the Matsuri course menu, which had a little bit of everything.   We started off with some seasonal appetisers – a delicate salmon tartar flavoured with yuzu, a Japanese citrus.  Yuzu is used frequently in Japanese cuisine – while it looks like an orange grapefruit in appearance, it’s slightly more lemon/lime-like in flavour, but without some of the tartness.

salmon tar tar

Followed by a chicken appetiser with leeks, and a clear broth soup,  or Dobin Mushi, served in a teapot. Dobin Mushi is a clear broth, flavoured with matsutake mushrooms, limes, chicken, shrimp and soy sauce.

ChickenDobin MushiDobin MushiDobin Mushi

Given a choice between raw food and fried, I will always go for the raw option, and had sashimi while the others had tempura.

Sashimi

For the main course we were given a choice of lobster with black cod, fillet or sirloin steak, which is cooked in front of you on the hibachi tables. I went for a sirloin steak, barely seared and as rare as possible.   It was exquisitely flavoured and seasoned, and was accompanied by a side of rice and a wasabi mayonnaise sauce.

HibachiHibachijapanese steak

All the flavours of Matsuri were quintessentially Japanese – delicate and complex, and without the clumsy seasoning of the fake-Japanese chains you are frequently served in London. It was all delicious,  and presented beautifully (bonus points from me).  To finish off a perfect meal, I went for a kinako (soybean flour) ice cream, while others opted for the green tea (matcha) tiramisu, or something called a dragon ball, which seems to be ice cream which has been set on fire.

dragon ballkinako ice creamgreen tea tiramisu

It is always an absolute pleasure to dine at Matsuri St James and this time was no exception!

A few months ago, I was contacted by Brita to do a post for their Better with Brita competition, where I included a recipe for Thai iced tea. I’ve been working with Brita on their Better with Brita campaign and competition, and have submitted a recipe of my own! Entrants of the Better with Brita competition are all vying for the change to  get to showcase and sell their own produce at the Big Feastival, one of the biggest food festivals in the UK this August. Entries close on 30th of June, and you can start voting from any time now til the 7th of July. All you’ll need to enter is a photo of your dish, which must include filtered water as an ingredient, as well as the recipe. Check out some of the other mouth-watering entries here!

For my entry, I’ve decided to submit a recipe for roasted aubergine with a miso glaze, or nasu dengaku as it is known in Japanese. This dish is sweet, tangy and definitely moreish – it’s also really low in fat and calories, and is ideal to make on fast days, especially on the 5:2 diet. Miso is great, a great source of protein and B-vitamins – it also lowers cholesterol and aids in digestion.

For this recipe, you will need:Miso eggplant

2 aubergines

100g miso paste

3 teaspoons of  sugar

4 tablespoons of mirin (Japanese cooking wine) – you can subsitute with sherry or sweet marsala

vegetable oil

filtered water

sesame seeds

Cut the aubergines in half, and soak for 10 minutes in a bowl of water. This will reduce some of the bitterness in the aubergines. Using filtered water for this step really makes all the difference, as soaking the aubergines reduces some of the tang and bitterness in the aubergines. The quality of the water is also really important, and can really affect the flavour of the dish.Miso eggplantmiso aubergine

Turn your oven on up to 250 degrees to pre-heat while you prepare the aubergines. Drain the water, and score the aubergines, brushing each side with some oil. Place them on top of some foil, and roast them for ten minutes with the scored side up, and five minutes with the bottoms up. While the aubergines are roasting, mix the ingredients for the glaze in the saucepan and let it simmer and reduce, until most of the liquid has disappeared. Add a drop of water to the saucepan so the glaze doesn’t stick to the bottom and burn.

Once the aubergine has roasted, take them out of the oven and top the scored side with the miso glaze. Turn on the grill, and place the aubergine under the grill for three minutes.

Top with sesame seeds and serve. I served mine with a side of miso soup, but this works as a side dish with grilled fish or chicken with a bowl of plain rice.

2014-06-08 13.58.43miso auberginemiso aubergine

I cannot wait for February to end.

Mainly because it means that it will be March, and I will be on holiday,  but also because I’ve just looked at my bank account to see that my balance is horribly depleted (mostly due to my frivolous spending). Mercifully, payday is close by, but as I scour the kitchen shelves to feed myself this feeling brought me back to my days as a student, and what I used to cook at university.

My idea of fast food growing up was my mom making me yakisoba, or fried Japanese noodles. I always seem to have the ingredients for my cobbled-together, frugal version of this meal to hand. It is by no means the proper, traditional recipe (so please don’t tell my old-school Japanese grandmother), but it is cheap, healthy and tasty which is fine by me.

The first time I cooked for Mr. A, I attempted to impress him by making yakisoba. Unfortunately it’s not one of those dishes you can just leave on the stove and come back to – it needs constant supervision. At the time, I was too busy paying attention to him instead and all the noodles clumped together to make one super noodle. It was seriously embarrassing and Mr. A referred to it as ‘noodle surprise’. Luckily he lived above a chip shop in Manchester at the time so neither of us were subjected to this monstrosity.

However, I like to think that I have learned many things since my time at university and how to cook noodles properly is one of them. For this recipe, you will need:

IMG_7510
What you’ll need:
Packet of udon or rice noodles
Spring onions
1 tbsp of oil (I used sesame)
4 tbsp soy sauce
Dash of Worcester sauce
Egg
Mayonnaise
Dried seaweed, nori
Peas
Garlic

If you have bought dried noodles, start to boil them in a saucepan. Ready to cook noodles can go in towards the end. Once the pan has come to a boil, strain the noodles and the rinse the noodles with cold water. This will keep them from clumping up (and becoming Super Noodle, or Noodle Surprise). They will be heated through again once they are fried.

IMG_7514

In a frying pan or wok, fry the spring onions and garlic in a wok on a high heat with a dash of pepper until they are lightly toasted. Add the soy and worcester sauce, then turn down the heat.

IMG_7518Pour the noodles into the pan with the sauce and vegetables.

IMG_7521Stir through until each noodle is coated in the sauce, and add the peas. As you would with a carbonara, crack an egg into the noodle mixture and stir it through so that the egg is incorporated into the mixture. (If you are vegan, you can leave the egg out, it will not make much difference). Once the egg has cooked, dish out the noodles.

IMG_7523Once served, add a little mayonnaise and sprinkle the nori seaweed on top. The nori will give it a crunchy texture. I love nori. So much that I named my cat after it.

And there you have it! This dish is pretty versatile – it is easily vegan friendly (just leave out the egg and mayo), and if you’re one of those people who can’t accept a meal without meat in it then this is a great meal to have with bacon. Just use sparingly, if you insist on keeping the mayo in, too.